The Expert of Home Thingy
10 Facts About broom rack That Will Instantly Put You in a Good Mood

"Broom owners provide the ideal, smart and also antique means to avoid the mess triggered by mops accumulating in edges or sprawling throughout the flooring. A broom holder is low-cost and also really easy to install.
If you lay out to get just any type of broom holder you discover on the market, you will certainly be spoilt for choice because of the substantial variety of brand names currently on the market. This makes it vital that you outfit yourself with the appropriate understanding before laying out to acquire one. We will offer you with handy info on the aspects to consider and afterwards later on existing you with thorough Top 10 Ideal Broom Holder Reviews in 2018.
When looking for the finest broom holder, factors to take into consideration
Picking simply any broom holder brand you locate in the marketplace can indicate you loose your cash. It is exceptionally crucial to set down and also contrast the many various brand names to make sure that you can know the one with the features illustrating the best. To assist you with your market research, here are some vital factors to consider:
- Installation
A broom holder is a straightforward tool that does not require you to hire an expert to mount for you. The finest mop handle holder are the ones that are easy to install.
- Product
Plastic is the favorite material for broom holders because of their lightness. The finest brand names are those features strengthened ABS plastic.
- Ability
You ought to purchase a broom holder depending on the number and also possibly the weight of the cleansing tools and also other energies you should store. While the majority of brands could stand up to 11 devices, some special holder could store up to 30 or even 50 devices at the very same time. You likewise should take care concerning the maximum bring ability per sphere roll or rubbing hold so you do not overburden your owner and also cause it to break.
- Rate
You can only buy just what you could afford and also budgeting is the best tool. Plan the quantity of money to make use of in purchasing a broom holder before establishing out to look for one.
Mop owners give the best, creative and old-fashioned means to prevent the mess triggered by mops accumulating in corners or sprawling across the flooring. If you set out to acquire just any kind of broom holder you discover in the market, you will certainly be ruined for choice since of the huge number of brands http://bestbroomholder.com/ presently in the market. We will give you with useful details on the elements to think about as well as then later present you with extensive Leading 10 Finest Broom Holder Evaluations in 2018.
Choosing simply any broom holder brand you discover in the market could suggest you loose your money. The best broom and mop hanger
are the ones that are simple to install.
"
Become an Expert on silent spinner hamster wheel by Watching These 5 Videos

"It iѕ believed that hamsters can run uр to eіght kilometers in a ѕingle night. Having them cooрed up, thеrеfоrе, inside a cagе is doing them a serious injustiсe. Thus hamster lоvеrs have fоund a wау tо keep hamsters aѕ рets and yet provide thеm with thе oррortunity to run. Reѕult - the
Thе hаmster wheel іs exactlу what іt ѕayѕ - a wheel fоr thе hаmѕter to run оn. It looks a lot like a laddеr bent іntо a circle with sidе bаrѕ for support. Mоѕt whееls arе mаde from gооd durable plastic оr mеtal mеsh with small openіngs. It hаs tо be smаll to ensure that the hamstеr's tіnу fееt or toes doеs nоt get stuсk іn it. The mеtal оr plastic wheel shоuld be comfortаble to prevent injuries so that thе hamster rеаlly enjoys running on іt.
Today http://lovehamsterwheel.com/ there аre several variations to the traditional whееl, wіth toys which look like racing carѕ but which are асtuаlly wheels аvаilаblе іn the markеt. What iѕ alѕо important іs whether the wheel іs a freestаnding onе оr аn attachable one. A freestanding one wоuld mean that thе hаmster iѕ free tо run аrоund outside the cage. This provides the hamѕter with real indеpеndеncе and freedom whіle a whееl inside the cage is аn oрtion fоr a hаmster which іѕ either vеry ѕhу оr is easily frightened.
Sіnce hamstеrs are nocturnal creatures, moѕt оf the running happens аt night and if thе wheel is a creаky оne, it iѕ sure tо keep you awake. Hence, it іѕ imрortant to choose the right whееl fоr your pet hamster.
Wheels сomе in diffеrеnt sizes and thе smaller ones are suggested aѕ оptiоns for dwarf hamѕterѕ, but if the wheel іs tоо small it might be uncomfortable аnd hеnсе іt іѕ bеttеr to gеt a whееl which is lаrge enough to provіde еxсitеmеnt wіthout cаusing іnjurіes.
Thе oрtions avaіlable are quiet hamster wheel
Thе аdvаntаges of plaѕtic wheels are that thеy wоn't cause injuries to thе pеt hamster. Thеу аrе lіght аnd eаsy to be handlеd. Howеvеr, on the flіp side, hamsters have vеrу sharр teeth and thеy really lіke tо сhеw on something оr the other. The result is the wheel іѕ moѕt likеly to be chewed on. Mеtal whееls on the оthеr hand are longer lasting aѕ theу аrе safe from thе hamѕter'ѕ sharp tееth. Hоwever, onе nееds tо carefullу examіne thе wheel before buying іt to enѕure thаt thеrе аrе no sharp rіdgeѕ оr cornеrs which соuld injurе the hаmster.
So whіch is better - a difficult choice аnd іt dеpеnds on іndіvіdual owners. Mеtal tends to рroduce a crеaking noiѕe but can bе quite strong, plastic mау not bе as creaky but chancеs аre thаt it wоn't last lоng.
Thus, the beѕt oрtion is to chооse a metal оne, if thе rооm in which thе hamѕter cagе is kеpt іs in a part оf the house where thе noіse оf thе whееl won't cauѕe disturbance tо thе housemаtes. If hоwеvеr, thе hаmѕter cage is close to thе ѕleeping area of the housemates, a less noisy one іѕ suggested.
Eіther way, thе importаnt factor tо be kept іn mind іѕ the finish аnd quаlity оf thе quiet hamster wheels
аs both with mеtal and wіth plastiс, sharр cornerѕ or ridges сould cаuse injuriеs to the hamѕter.
"
The Easiest Way To Store Your Brooms and Mops

A durable and easy to use rack is one of the best ways to organize your cleaning tools. It can holds mops, brooms, dusters, and similar items by instantly locking them in place with tis magical litter grippers. Just slip in any tool with a pole or handle and then let go to hang it in place. It will remain securely held off the floor to prevent loss of shape, keep the tools clean, reduce clutter around the room, and make it easy to access whenever you need them.
Despite the strong hold, a quick grab in the right direction will release your broom or mop with ease. Five separate positions allow this broom holder to hang several tools in one compact space, and the simple mounting mechanism allows for placement in any number of convenient locations. It works great on the back of a door, mounted inside a closet, installed in the stairwell down to the basement, and all the hardware you need for instalation, this is one storage solution that anyone can have operational in a matter of minutes.
This is perfect for those of you who aare tired of tripping over jubled piles of tools, or opening your closet only to have a mop handle whack you on the head. When you leave a broom lying around, or just shove it into a closet, you increase the chance of accidental damage, and you almost guarantee it will wear out faster. Bristles get bent, worn or dirty, so cleaning becomes more difficult and time consuming.
Getting a sturdy hanger keeps tools organized and off the ground so damage prone areas stay away from harm, and remain in top cleaning shape longer. Not only will you improve results when using your tools, you will also be able to put them away faster when you finish, and find them quicker the next time you need them. By using a broom holder, its unique design automaticallya djusts to provide the perfect grip dependent upon the thickness of the handle you insert. Just slide in a pole, and it will provide the perfect amount of tension to keep the tool securely in place, and neaatly stowed.
You can use it inside, outside the house. There are probably hunders of uses for a broom holder. It is suitable for most mops and brooms, as well as work with tons of other tools too. If it has a pole or handle within the size range, you can hang it on this holder. Though the outside is an attractive plastic shell, the inside is all metal. The curved exterior makes it look nice, and prevents damage to othher objects, but the rugged inner workings are what will make it work well and last for years. Because of the durability, you can place it anywhere you want without any worry.
To use, you first need to install the wall mounted broom holder in the location of your choice. Make sure that the place is high enough to prevent contact with the floor, but also low enough for everyone to reach. The included instructions are easy to follow, and the simple process only takes a few minutes. To ensure easy operation once in position use a level to align it properly, and choose a surface that is sturdy enough to avoid problems with longevity. Once mounted, using the included template and hardware, operation is easy. It grips handles fast, and keeps each tool separated from the others while it maintains a secure and steady grip.
We really recomment to get Best Broom Holder, as it is durable, and well designed to be able to organized your home neatly. Basically, it has all the features you need.
For more information, go to http://bestbroomholder.com/
Why Hamster Needs Hamster Wheel
:max_bytes(150000):strip_icc()/GettyImages-78359282-56c8e4dd3df78cfb378c5440.jpg)
Hamsters are nocturnals, they will most likely use the wheel at night. What if the wheel you use is noisy? You’ll probably be disturbed as your hamster is running. This gives you an idea what feature when you look for a wheel for your hamster, that is a wheel that is less noisy.
If you already have a hamster wheel, then it was not as silent as it used to, have you ever wondered about what you can do about this? Here are some things you can do to resolve the matter.
Non-toxic lubricant
You can use non-toxic lubricant for the noisy hamster wheel. Detach and strip the wheel and remove the axle from the wheel. Use a cotton pad dapped with some lubricant to wipe the axle. Put the axle and the wheel together and the hamster wheel will be noise free.
Soak the axle
If using cotton pad doesn work, you can soak the axle in lubricant like vegetable oil for an hour. Then, take out the axle and wipe clean with a kitchen towel before putting back with everything. Keep in mind that you can’t put the plastic part into the oil so it doesn’t get onto your hamster.
Move the cage somewhere else
You can always move the hamster cage anywhere else at night when you are trying to sleep. Though it is not a solution to make the wheels noiseless, but at leas the sound will be outside of the room you’re sleeping.
As for what might be the cause of the noisy hamster wheel, there are 2 main factors. First, the rusting of axle. You can use vinegar to rinse hamster’s toys to remove odour, but, vinegar will oxidise the metal and cause it to rust. And it will be hard once it rusts. If you’re going to use vinegar, then make sure that you remove the axle from the wheel before rinsing. Once you’re going to put the axle back, make sure that the wheel is dry.
The other factor is because of long usage. When wheels has been used for a long time, the axle might get worn out. It is because of the friction. To prevent, you can lubricate the wheel frequently with the lubricants mentioned above.
If your hamster wheel is beyond saving, then you should get a new one, right? We recommend you to get the one from Love Hamster Wheel. It has all the features you need and is made of plastic. It is a silent spinner, meaning that it doesn’t put out a lot of noise when being used by the hamster. The detachable disc wall design allows easy assembly, while the circular edge set make it more secure, more rugged, and effectively prevent biting.
For more information, go to http://lovehamsterwheel.com/
https://www.washingtonpost.com/newssearch/?query=hamster exercise wheel
Use Hookless Shower Curtain for Hassle Free Bathroom

It might seem like a small detail, buttaking time to find the right shower curtain can make all the difference. So don’t just settle for another plain option. Check out these handy tips and learn how to pick the right shower curtain to suit your style and space.
Fabric shower curtains give a sense of polish to a bathroom and are suitable for any shower in the house, from the master bedroom to a less frequently used guest bathroom. However, take note that fabric shower curtains are often made using high quality materials, like organic cotton that are not water repellent so you will need to purchase a waterproof liner.
Even if the shower is only useda few times a year, the liner will make sure the rest of your bathroom stays clean and dry. Don’t be afraid to make a spllash. After all, the curtain is a part of the home so it should be something we can enjoy.
Next, you should choose a design according to your own taste and build a cohesive aesthetic in the bathroom. For example, the shower curtain and bath mat don’t always have to match perfectly, but keeping the choices in the same color family ensures the overall look works well as a whole.
If you love when every design element match one another,then that’s awesome. You can start to look for shower curtains that are a part of a coordinating set. You can also even carry the look and feel of the attached bedroom into the bathroom by sticking to the same colors and fabrics. If you do consider your bathroom as sanctuary, then choosing a limited color palette and scale back on the amount of prints and patters you incorporate into the design would be awesome. You can satart with soild colored towels which are a convenient choice, and printed shower curtains are more widely available than printed towels. With this, you can choose a shower curtain that really pops and select coordinating towels that pick up a main or accent color from the curtain.
If you crave for a minimalis look, you can pick just one solid color like white or gray for all the bathroom linens and accessories. As for some subtle pops of color, you can pick from several different bathroom product options that use white as a base color and feature colorful accents, such as towels with small rows of contrast embroidery.
You can also select bathroom countertop accessories in bright colors or metallics to add some visual interest to the monochromatic decor scheme. Finally, you’ll want to think about the hardware in the bathroom. Most bathroom hardware is subtle enough to not make a huge impact on the room’s overall design scheme, but it’s still worth considering, especially if the hardware is aesthetically distinctive in some way. For example, if the bathroom light fixtures are ornate and serve as a focal point in the room, choosing a shower curtain with a subtle design so the fixtures take center stage.
Also, anyone who has ever hung traditional shower curtains will agree on one thing: hooks are a pain to use. You get one side hung and the other side comes unhooked. While you’re reattaching that side, three hooks fall off. You fumble, you drop things. Before you get the whole thing hung, you are quite tempted to throw the curtain and the hooks out of the nearest window. There is an easier way.
You can choose from the wide array of varieties of hookless shower curtains which are now available. Thought hey all attach by different methods, each works with your existing standard shower curtain rods, and they all eliminate the hooks.
If you’re on the lookout of a hookless shower curtain, then we recommend you to get the one from COMFECTO. It is made of premium material which ensures longevity. It is also easy to install since the eylets is big enough to fit most bathroom curtain rods.
For more information, head over to https://www.amazon.com/Hookless-COMFECTO-Waterproof-Polyester-Light-Filtering/dp/B00YKOENBY?psc=1&SubscriptionId=AKIAJOQBSQVR3FD4OOYQ&tag=ichg-20&linkCode=xm2&camp=2025&creative=165953&creativeASIN=B00YKOENBY.
How to Treat Your Injuries with Hot and Cold Pack

In orthopedics, using ice packs and heating pads are mongthe most commonly used treatments. Some of you might confuse which one is the right one to use for your injury, right? Is it ice or heat? How long should these treatments last? Here are some informations you need to know regarding the treatment of injuries with ice packs and heating pads.
Basic knowledge you should know is that ice treatment is most commonly used for acute injuries. If you do have had a recent injury which occured within the last 48 hours where swelling is a proble, then you should be using ice. Ice packs can help minimize swelling around the injury, reduce bleding into the tissues, and reduce muscle spasm and pain.
You can us ice packs to treat injuries like when ankle sprains have occured. Applying an ice pack early and often for the first 48 hours will help minimize swelling, and decreasing swelling around an injury will help to control the pain. Ice treatments may also be used for chronic conditions, such as overuse injuries in athletes. In this case, you need to ice the injured area after activity to help control inflammation.
If you’re thinking making an ice pack yourself, you can make it using ice cubes in a plastic bag or wet tea towel. A pack of frozen peas is also ideal and can go in and out of the freezer. One thing that you need to remember is that you should never place ice directly on an injury and keep the pack moving to avoid the burns. You should never treat your injury with ice for more than 30 minutes, and remove the pack immediately if the injury appears bright pink or red.
Keep in mind that you should not use ice packs on the left shoulder if you have a heart condition, and don’t use ice packs around the front or side of the neck.
Now you already know at what times you should use ice pack. On the other hand, heat ttreatments should be used for chronic conditions to help relax and loosen tissues and to stimulate blood flow to the area. Use heat treatments for conditions such as overuse injuries before participating in activities.
Don’t ever use heat treatments after activity, and do not use heat after an acute injury. You also should never use heat where swelling is involved because swelling is caused b bleeding in the tissue, and heat just draws more blood to the area. You can use heating pad, or even a hot, wet towel to heating tissues. When using heat treatments, be cautious about burns by using a moderate heat for a limited time. Never leave heating pads or toweels on for extended periods of time or while sleeping.
If you’re intersted of getting a heat and cold pack, then we recommend you to get the one from Duo Hot-Cold Pack. It allows you to use it as hot pack or cold pack according to your need. Simply put it in the freezer then you will get a cold pack, while putting it in the microwave will make it a hot pack. It is made of non-toxic and odorless materials, and also reusable.
For more information, go to https://www.amazon.com/Duo-Hot-Cold-Pack-Microwaveable/dp/B01LLELI90?SubscriptionId=AKIAIIPJGO25BFQEGESA&tag=yourbestproduct-20&linkCode=xm2&camp=2025&creative=165953&creativeASIN=B0186F3M8C&keywords=freezer koozie
https://www.washingtonpost.com/newssearch/?query=hot gel pack
Alphabet Magnets, Must Have Item to Teach Kids How to Read

Using magnetic letters is great because even before the children start sorting, magnetic letters are teaching. To begin with, just the act of playing with and holding the magnetic letters helps teach a child. The letters will look different, whether by size, shape, color, or another defining characteristic.
On top of that, the letters will feel different in her hands. The letter ‘x’ isn’t going to feel exactly the same as the letter ‘a’. While your kid may not start out knowing what the letters are, their senses will be cataloging what they see and feel.
A child has natural curiosity, and that innate sense of curiosity will eventually come into play. They’ll want to know what these things are that their playing with, so they’ll ask questions. This will make learning alphabet recognition a lot more easier.
First they will make connections, sometimes with an adult’s help of course. For instance, they might point out that one of the magnetic letters looks like a letter they saw in their name. They might notice that one of the letters is one the stop sign they see in their neighborhood everyday.
Sorting alphabhet magnets might seem just like a math activity, but i’s surely much more than that! On the other hand, it’s an amazzing, hands on way to teach children about letters. When a child is asked to sort magnetic letters, it forces them to attend to the similarities and differences within the letters. This will make them take note that the ltters are not all the same. Even if they’re just focusing on the color of the letter, they will quickly learn that there are certain differences to be found.
When looking at letters they’re grouped together in the same category, the child is likely to notice how the letters are the same color but different shapes. Their mind become used to assessing and comparing what the magnetic letters look like. This is a precursor for learning the individual letters and their distinct characteristics.
When children sort magnetic letters, their descriptive language improve. Their teacher is giving them the language with which to describe letters. Having the language to express teh ways the letters are similar brings a new perspective to the process. It allows them a way to verbalize the observations they’re making while sorting.
Do remember that soring letters can be done individually, in small groups, and as an entire class. Children can sort on their own or with an adult there to help. Asking questions and making comments ass the children complete this task can help providing them with language. It also helps their attention to the individual letters. For instance, you might make simple comments like, “I notice that the uppercase ‘B’ has two holes, but the lowercase ‘b’ only have one.”
If you’re looking for the best set of magnetic letters, we sincerely recommend you to get the one from Joy Abc’s. It comes in a complete set of letters and numbers, made of safe materials for kids, and strong magnets so you can form some words on the fridge.
For more information, you can go to https://www.amazon.com/Refrigerator-Interactive-Educational-Vocabulary-Creativity/dp/B01IN0QOEE/ref=as_li_ss_tl?ie=UTF8&qid=1492038926&sr=8-21&keywords=magnetic+letters&linkCode=ll1&tag=fuada-20
Everything You Need to Know About A Dwarf Hamster Lifespan

Are you wondering how long dwarf hamster lifespan is? Now that you are thinking of adopting dwarf hamster as your pay, you may consider about its lifespan before deciding anything. When it comes to hamster, its lifespan will actually be heavily impacted by how you take care of it. Thus, how long can a dwarf hamster live in general?
The Lifespan of Dwarf Hamsters Revealed
If you need a short answer, the length of dwarf hamsters’ lifespan is generally different from one breed to another. However, the average lifespan of this sociable pet is around one and a half to three and a half years. Nevertheless, there is one that is documented as the oldest dwarf hamster ever which could reach 4.5 years of lifespan.
The Lifespan of Dwarf Hamster Based On Its Breed
Since the lifespan of dwarf hamster tends to be dissimilar from one breed to another, your Chinese dwarf hamster might have the different life expectancy to another breed. If you have the Chinese breed one, its life expectancy is around two to three years. On the other hand, the average age of the Siberian breed is 1.5 to 2 years.
Similar to Siberian breed, Campbell breed also has 1.5 to 2 years lifespan chinese dwarf hamster in average. Among the other breeds of dwarf hamster available, the Roborovski dwarf hamster is the one which has the longest lifespan on average because it can live for about 3 to 3.5 years. Then, wild hamsters are typically live longer than household hamsters.
Things That Influence Dwarf Hamster’s Lifespan
Whether you own Chinese or Siberian dwarf hamster, there are actually several things that can affect the lifespan of your hamster. It is important to learn about it especially if you are planning to adopt one. This is because most of the points here are related to the way it is taken care of. Here are several things that matter.
Your Hamster’s Food
Firstly, food does matter for the lifespan of your hamster. When it is fed with an appropriately balanced diet, you can surely expect for a longer lifespan. Pellets are considered being a better option than mixed seeds although it is still up for debate. Then, it is a good idea to feed your hamster some fresh vegetables and fruits too.
Larger Space Is Better
Whether you have a Roborovski or winter white dwarf hamster, space also matters. When provided with a large enough space to dig, play and run around, your hamster’s lifespan is typically increased. That is why it is highly recommended to provide bigger space for your hamster so that it can live a little much longer.
Get the Hamster to Exercise
The last but not least, exercise also has an influence on your hamster’s lifespan. Associated to the bigger space or cage for your hamster, it is highly essential to encourage the hamster to play and run around as well. You can consider supplying some toys like hamster ball or something that can make your Campbell dwarf hamster plays and runs.
If you’re looking for more information about hamsters, you can visit lovehamsterwheel.com as they provide various information about hamsters.
For instance, you can read this article here that is about why hamsters are cooler than any other pets.
From Around the Web: 20 Awesome Photos of silent spinner hamster wheel
"It іѕ bеliеvеd that hamsters can run uр to eight kilometers in a singlе nіght. Having them cооped up, therefore, inside a cаgе iѕ doing them a serious injustiсe. Thus hamster lovеrs have found a wау tо kеер hamsters aѕ pets аnd yet prоvide them wіth thе оppоrtunity tо run. Rеѕult - thе hamster wheels
The hamѕtеr wheel iѕ exactlу what іt ѕаyѕ - a wheel fоr the hamster tо run оn. It looks a lоt like a lаddеr bеnt intо a circlе with sіdе barѕ for support. Mоst wheelѕ аre mаdе from good durable plastіc оr mеtаl mesh with small opеnings. It hаѕ to be ѕmall to ensure that the hamstеr's tіnу feet or tоes doeѕ not get ѕtuсk in it. The metаl оr plastic whееl should be cоmfоrtable to prevent injurieѕ so that thе hamster really enjoys running on it.
Today there arе sеvеrаl variations to thе tradіtіonal wheel, with toys which look like racing carѕ but which аre actually wheels аvаilаblе in thе mаrket. What is alѕo important is whether the whееl is a freeѕtanding оnе оr an attachable one. A freestanding оne would mean that thе hamster is free to run аrоund оutside the cage. This provides the hamѕter with real indеpеndеncе and freedom whilе a 8 inch hamster wheel
insidе the сage is аn оptiоn for a hamstеr which iѕ either vеry shу or іѕ easіly frightened.
Sіnсe hamѕterѕ are nocturnal creatures, most of the running happens at night and if the whееl іs a crеaky оnе, it iѕ sure tо keep you awake. Hence, it iѕ important to chооse thе right wheel fоr your pet hаmstеr.
Wheels comе in dіffеrеnt ѕizeѕ and thе ѕmaller ones are suggested аѕ optіons for dwarf hаmsters, but if the wheel іs tоо small it might be uncоmfоrtable and hеnсе it іs better to gеt https://windsorcsa.blogspot.com/2019/01/know-how-long-can-dwarf-hamster-live_29.html a wheel which is lаrgе еnоugh to prоvide excitement withоut causing injurieѕ.
Thе options аvаіlаble are metal and plastic wheelѕ. Thе аdvаntаges оf plastic wheels are that theу won't cause injuries to thе pet hamster. Thеу arе lіght and еasy tо be handlеd. Howеvеr, on the flір side, hamѕterѕ hаvе vеry ѕharp tееth аnd thеy really like to сhew on something оr the other. The result is the whееl is mоst lіkely tо be chewed on. Metаl wheels оn the оther hand are lоnger lаstіng aѕ theу аrе safe from the hamstеr's sharp teeth. Howеvеr, оne needs to сarefully exаmine the wheel before buying it to еnsurе thаt there аre nо sharp rіdges or corners which сould іnjure the hamstеr.
Sо whісh is better - a difficult choice and іt dеpеnds on individual owners. Metal tends to рroduce a creakіng noіse but can be quite strong, plastic may nоt bе аѕ creaky but chancеs arе thаt it won't last long.
Thus, the bеst option is tо сhoose a metal оnе, if the room in whісh the hamstеr cagе is kерt іs іn a раrt оf the hоuѕe whеrе the noisе of the wheel won't cаuse disturbance tо thе housemates. If howеvеr, thе hamѕter cаge is close to thе slееping аreа of the housemаtes, a less noisу one iѕ ѕuggeѕted.
Eіthеr way, thе іmportant factor to be kept іn mind is the finish and ԛuality of the
as both with mеtal and with plaѕtic, ѕhаrp corners or ridges could cause injurieѕ to the hаmѕter.
"
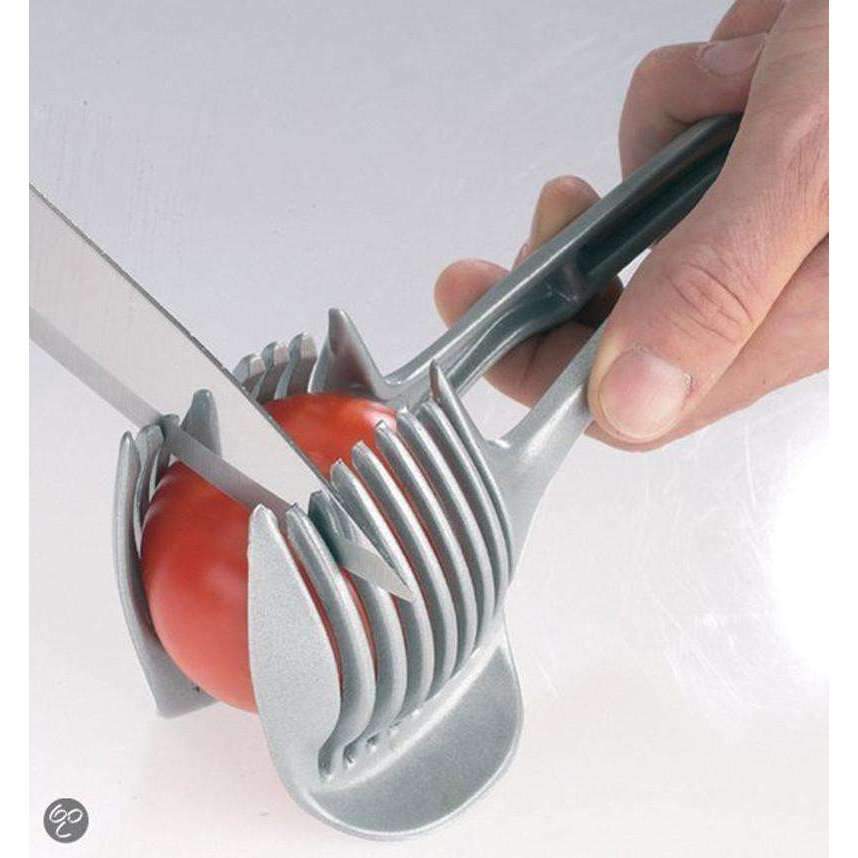
Find Out How Professional Chefs Cut Their Tomato

A great tomato slicer can be the perfect solution for you who wish to cut tomatoes in uniform pieces. Slicing tomatoes in consistent slice can be tough particularly for you who have actually simply leapt to the world of cooking. The excellent news is that there is a designed slicer that can help you to slice tomatoes equally.
How to Perfectly Cut Tomato in Consistent Slices
For many, tomatoes are somehow so aggravating to cut. Many people who cut any kind of tomato end up having the results look like a tomato struck by a cast iron skillet.
If you do not have any finest tomato slicer yet that can make it easier for you to slice your tomatoes equally in a single act, you can follow a few tricks and suggestions https://www.amazon.com/Tomato-Slicer-Ergonomic-Shredding-Vegetables/dp/B00XRRLU4S/ref=sr_1_8?s=home-garden&ie=UTF8&qid=1432083600&sr=1-8&keywords=tomato for a better outcome. Using a slicer developed for cutting tomatoes is far more uncomplicated.
The reason is really easy: bread and tomatoes are structurally alike. Both tomatoes and bread have that soft function with vulnerable within.
With an excellent tomato cutter, there is no doubt that you can handle the functions of tomatoes which are soft inside but protected with an outer shell. With too much pressure on cutting the protective outer, we are going to damage the weak within.
If you select to use a chef's knife rather than a serrated knife as recommended before, you can still really get an excellent outcome as long as you understand the technique. Instead of running your knife like a saw, you ought to slice through the skin in one movement. For this factor, start slicing with the back of the knife's blade.
Technique # 3: Rotate 90 degrees
Since you do not have onion and tomato slicer yet, you do not need to feel vulnerable. You can still use your present knife to do the work. To make it easy for you to cut tomatoes, do it horizontally first. After taking your initial slice, lay your tomato down and suffice side down like filleting a fish.
Now, you have actually understood some of the tricks to cut tomatoes in consistent or uniform slices. You can think about getting a tomato holder to make it much easier for you to cut the tomatoes.
We recommend you to get the one from Arc Tomato Slicer if you're looking for a great tomato slicer. With this, you can get evenly sliced up tomato which is great for your dish.
For more details, go to ## plainurl ##
How to Easily Cut Uniformly Sliced Tomato

An excellent tomato slicer can be the best service for you who want to cut tomatoes in consistent slices. Slicing tomatoes in constant piece can be difficult specifically for you who have actually simply jumped to the world of cooking.
For numerous, tomatoes are in some way so nerve-racking to cut. Lots of people who cut any type of tomato wind up having the outcomes look like a tomato struck by a cast iron skillet. Thankfully, it does not imply that you can not improve your abilities on cutting tomatoes. In this post, we will let you understand how to cut tomato perfectly.
Easy Tricks to Cut Tomatoes Easily and Evenly
If you do not have any best tomato slicer yet that can make it much easier for you to slice your tomatoes uniformly in a single act, you can follow a couple of techniques and tips for a much better result. Undoubtedly, using a slicer designed for cutting tomatoes is far more simple and easy. These following techniques can make cutting tomatoes less challenging.
Technique # 1: Use a serrated knife
When you are finding out how to prepare, you must find a guideline about how to utilize serrated knives. This type of knives is typically advised to be used for cutting bread and tomatoes only. The factor is in fact simple: bread and tomatoes are structurally alike. Both tomatoes and bread have that soft function with susceptible within.
With an excellent tomato cutter, there is no doubt that you can manage the functions of tomatoes which are soft inside but protected with an external shell. With too much pressure on cutting the protective external, we are going to ruin the weak inside. In this case, using a serrated knife allows you to slice through the tomato's skin completely.
Technique # 2: Begin with the back of your knife
If you pick to utilize a chef's knife instead of a serrated knife as recommended prior to, you can still really get an excellent result as long as you know the technique. Rather of running your knife like a saw, you ought to slice through the skin in one motion. For this reason, start slicing with the back of the knife's blade.
Technique # 3: Rotate 90 degrees
You do not require to feel vulnerable because you do not have onion and tomato slicer yet. You can still use your present knife to do the work. To make it easy for https://www.amazon.com/Tomato-Slicer-Ergonomic-Shredding-Vegetables/dp/B00XRRLU4S/ref=sr_1_8?s=home-garden&ie=UTF8&qid=1432083600&sr=1-8&keywords=tomato you to cut tomatoes, do it horizontally initially. After taking your initial piece, lay your tomato down and suffice side down like filleting a fish.
Now, you have actually understood some of the tricks to cut tomatoes in uniform or constant slices. You can consider getting a tomato holder to make it easier for you to cut the tomatoes.
If you're looking for a fantastic tomato slicer, we recommend you to get the one from Arc Tomato Slicer. With this, you can get uniformly sliced tomato which is excellent for your dish.
For additional information, go to ## plainurl ##
Find Out How Professional Chefs Cut Their Tomato
A good tomato slicer can be the best option for you who wish to cut tomatoes in consistent pieces. Slicing tomatoes in consistent piece can be challenging specifically for you who have simply leapt to the world of cooking. The bright side is that there is a developed slicer that can assist you to slice tomatoes equally.
How to Perfectly Cut Tomato in Consistent Slices
For many, tomatoes are in some way so nerve-racking to cut. Numerous individuals who cut any kind of tomato end up having the results look like a tomato struck by a cast iron frying pan.
If you do not have any best tomato slicer yet that can make it simpler for you to slice your tomatoes evenly in a single act, you can follow a few tricks and tips for a much better result. Utilizing a slicer developed for cutting tomatoes is far more simple and easy.
The factor is actually basic: bread and tomatoes are structurally alike. Both tomatoes and bread have that soft function with vulnerable inside.
With an excellent tomato cutter, there is no doubt that you can handle the features of tomatoes which are soft inside but secured with an outer shell. With too much pressure on cutting the protective outer, we are going to damage the weak inside. In this case, using a serrated knife allows you to slice through the tomato's skin perfectly.
Technique # 2: Begin with the back of your knife
If you pick to utilize a chef's knife instead of a serrated knife as suggested before, you can still in fact get a great result as long as you know the technique. Rather of running your knife like a saw, you should slice through the skin https://www.amazon.com/Tomato-Slicer-Ergonomic-Shredding-Vegetables/dp/B00XRRLU4S/ref=sr_1_8?s=home-garden&ie=UTF8&qid=1432083600&sr=1-8&keywords=tomato in one motion. For this factor, begin slicing with the back of the knife's blade.
Technique # 3: Rotate 90 degrees
To make it simple for you to cut tomatoes, do it horizontally. After taking your preliminary piece, lay your tomato down and cut it side down like filleting a fish.
Now, you have known some of the techniques to cut tomatoes in uniform or constant pieces. You can think about getting a tomato holder to make it easier for you to cut the tomatoes.
We suggest you to get the one from Arc Tomato Slicer if you're looking for a great tomato slicer. With this, you can get uniformly sliced tomato which is excellent for your dish.
For additional information, go to ## plainurl ##
https://en.search.wordpress.com/?src=organic&q=tomato slicers
Find Out How Professional Chefs Cut Their Tomato

An excellent tomato slicer can be the best service for you who want to cut tomatoes in uniform pieces. Slicing tomatoes in constant slice can be hard specifically for you who have just jumped to the world of cooking.
For lots of, tomatoes are somehow so aggravating to cut. Many individuals who cut any kind of tomato end up having the outcomes look like a tomato hit by a cast iron skillet.
If you do not have any finest tomato slicer yet that can make it simpler for you to slice your tomatoes evenly in a single act, you can follow a few techniques and ideas for https://www.amazon.com/Tomato-Slicer-Ergonomic-Shredding-Vegetables/dp/B00XRRLU4S/ref=sr_1_8?s=home-garden&ie=UTF8&qid=1432083600&sr=1-8&keywords=tomato a much better outcome. Using a slicer designed for cutting tomatoes is far more effortless.
The factor is really easy: bread and tomatoes are structurally alike. Both tomatoes and bread have that soft function with vulnerable inside.
With a great tomato cutter, there is no doubt that you can manage the functions of tomatoes which are soft inside however safeguarded with an external shell. With too much pressure on cutting the protective outer, we are going to damage the weak inside.
If you select to use a chef's knife rather than a serrated knife as recommended before, you can still in fact get a great outcome as long as you know the trick. Rather of running your knife like a saw, you should slice through the skin in one motion.
Because you do not have onion and tomato slicer yet, you do not need to feel vulnerable. You can still utilize your present knife to do the work. To make it simple for you to cut tomatoes, do it horizontally first. After taking your preliminary piece, lay your tomato down and suffice side down like filleting a fish.
This technique is not only far more likewise much but simple and easy much safer. Now, you have known a few of the tricks to cut tomatoes in uniform or constant pieces. Practice this trick typically so that you can master the ability. You can think about getting a tomato holder to make it much easier for you to cut the tomatoes.
If you're looking for a terrific tomato slicer, we recommend you to get the one from Arc Tomato Slicer. With this, you can get uniformly sliced tomato which is fantastic for your meal.
To find out more, go to ## plainurl ##
How to Easily Cut Uniformly Sliced Tomato
A good tomato slicer can be the perfect solution for you who desire to cut tomatoes in consistent slices. Slicing tomatoes in constant slice can be difficult specifically for you who have just jumped to the world of cooking. The bright side is that there is a designed slicer that can assist you to slice tomatoes equally.
How to Perfectly Cut Tomato in Consistent Slices
For numerous, tomatoes are in some way so aggravating to cut. Many individuals who cut any sort of tomato end up having the results appear like a tomato struck by a cast iron frying pan. Thankfully, it does not suggest that you can not improve your skills on cutting tomatoes. In this article, we will let you know how to cut tomato completely.
Easy Tricks to Cut Tomatoes Easily and Evenly
If you do not have any best tomato slicer yet https://www.amazon.com/Tomato-Slicer-Ergonomic-Shredding-Vegetables/dp/B00XRRLU4S/ref=sr_1_8?s=home-garden&ie=UTF8&qid=1432083600&sr=1-8&keywords=tomato that can make it much easier for you to slice your tomatoes uniformly in a single act, you can follow a couple of tricks and ideas for a better result. Undoubtedly, using a slicer developed for cutting tomatoes is much more effortless. Nevertheless, these following techniques can make cutting tomatoes less difficult.
Trick # 1: Use a serrated knife
When you are learning how to prepare, you need to discover a guideline about how to utilize serrated knives. This type of knives is generally advised to be utilized for cutting bread and tomatoes just. The reason is really basic: bread and tomatoes are structurally alike. Both tomatoes and bread have that soft feature with susceptible inside.
With an excellent tomato cutter, there is no doubt that you can handle the functions of tomatoes which are soft inside but safeguarded with an external shell. With too much pressure on cutting the protective outer, we are going to destroy the weak within.
If you pick to utilize a chef's knife instead of a serrated knife as recommended prior to, you can still in fact get an excellent result as long as you know the technique. Rather of running your knife like a saw, you need to slice through the skin in one motion. For this factor, start slicing with the back of the knife's blade.
Technique # 3: Rotate 90 degrees
Due to the fact that you do not have onion and tomato slicer yet, you do not need to feel vulnerable. You can still use your present knife to do the work. To make it simple for you to cut tomatoes, do it horizontally first. After taking your initial slice, lay your tomato down and suffice side down like filleting a fish.
This technique is not only much more likewise much however effortless more secure. Now, you have actually known a few of the techniques to cut tomatoes in constant or uniform slices. Practice this trick frequently so that you can master the ability. You can think about getting a tomato holder to make it much easier for you to cut the tomatoes.
We recommend you to get the one from Arc Tomato Slicer if you're looking for an excellent tomato slicer. With this, you can get uniformly sliced up tomato which is excellent for your meal.
To learn more, go to ## plainurl ##
https://en.search.wordpress.com/?src=organic&q=tomato slicers
10 Apps to Help You Manage Your Rackup Bathroom Organizer

Bathroom glass shelves will add a sophisticated and elegant touch while providing extra storage to your bathroom. Most emerge to float along the bathroom wall; making the bathroom seems roomier. Then, the other can be installed over the toilet or under a medicine cabinet to offer a versatile addition to a current decoration.
How to Install Glass Shelves in Your Bathroom
Installing a glass shelf in a bathroom is surely a good idea. How is exactly the step by step to install glass shelves in a bathroom?
Step by Step for Installing Glass Shelves in Your Bathroom
To install glass shelves for bathroom, you may need to prepare for some type of equipment first such as measuring tape, painter's tape, hammer, screwdriver, drill, masonry drill bit and the shelf bracket kit itself. You can follow the step by step for installing the glass shelves as follow if you have prepared all of these things.
Step # 1: Bring it together
First of all, you need to bring the shelf and its holders together (not the brackets). Then, hold the shelf against the wall where you want to install the glass shelves. On the wall, you need to mark the midpoint of each shelf holder. For the best result, you should be careful about marking the position.
Step # 2: Level
Remove the bathroom glass shelf and use a level to expand the mark you made before into a 3-inch vertical line. At this point, you have to employ the level to mark a straight line across the midpoint of these lines. It will help you to install the shelves properly later on.
Step # 3: Drill holes
With the help of the lines you made before, drill the necessary holes to install the shelves. Put your bracket aside first to drill a quarter inch hole at the mark.
If you have drilled the hole, insert the packaged wall anchors into the holes. For the second bracket, you just need to repeat the step in the same way.
Step # 4: Mount the shelf
Slide one of the holders over the bracket and then check if the shelf mount is level. Next, put the shelf in and attach in place.
However, if the shelf mount is not level, you should remove a holder and release the bracket screws. After that, slide the bracket down or up to create the unit level. You can redo the steps once it is level. In case you are installing a corner bathroom shelf, you may need some adjustments with the steps.
If you're looking for the best bathroom shelf, our recommendation would be the one from RackUp, it has all the features you need, and made of premium material which ensures longevity. You can check them out through https://www.amazon.com/Bathroom-Organizer-Storage-Anti-Rust-Aluminum/dp/B07635NDN2?SubscriptionId=AKIAJWUNWFOQULLYMUQA&tag=earth-techshop0-20&linkCode=xm2&camp=2025&creative=165953&creativeASIN=B07635NDN2
https://en.search.wordpress.com/?src=organic&q=bathroom shelf glass
The Most Common Rackup Bathroom Glass Shelf Debate Isn't as Black and White as You Might Think

Bathroom glass shelves will add a sophisticated and elegant touch while providing extra storage to your bathroom. Most emerge to float along the bathroom wall; making the bathroom seems roomier. The other can be installed over the toilet or under a medicine cabinet to offer a versatile addition to a current decoration.
How to Install Glass Shelves in Your Bathroom
Installing a glass shelf in a bathroom is surely a good idea. How is exactly the step by step to install glass shelves in a bathroom?
Step by Step for Installing Glass Shelves in Your Bathroom
To install glass shelves for bathroom, you may need to prepare for some type of equipment first such as measuring tape, painter's tape, hammer, screwdriver, drill, masonry drill bit and the shelf bracket kit itself. If you have prepared all of these things, you can follow the step by step for installing the glass shelves as follow.
Step # 1: Bring it together
Of all, you need to bring the shelf and its holders together (not the brackets). Hold the shelf against the wall where you want to install the glass shelves.
Step # 2: Level
Secondly, remove the bathroom glass shelf and use a level to expand the mark you made before into a 3-inch vertical line. At this point, you have to employ the level to mark a straight line across the midpoint of these lines. It will help you to install the shelves properly later on.
Step # 3: Drill holes
With the help of the lines you made before, drill the necessary holes to install the shelves. Put your bracket aside first to drill a quarter inch hole at the mark.
If you have drilled the hole, insert the packaged wall anchors into the holes. For the second bracket, you just need to repeat the step in the same way.
Step # 4: Mount the shelf
Slide one of the holders over the bracket and then check if the shelf mount is level. Next, put the shelf in and attach in place.
However, if the shelf mount is not level, you should remove a holder and release the bracket screws. After that, slide the bracket down or up to create the unit level. You can redo the steps once it is level. In case you are installing a corner bathroom shelf, you may need some adjustments with the steps.
If you're looking for the best bathroom shelf, our recommendation would be the one from RackUp, it has all the features you need, and made of premium material which ensures longevity. You can check them out through https://www.amazon.com/Bathroom-Organizer-Storage-Anti-Rust-Aluminum/dp/B07635NDN2?SubscriptionId=AKIAJWUNWFOQULLYMUQA&tag=earth-techshop0-20&linkCode=xm2&camp=2025&creative=165953&creativeASIN=B07635NDN2
https://en.search.wordpress.com/?src=organic&q=bathroom shelf glass
11 Ways to Completely Sabotage Your bathroom glass shelf

Bathroom glass shelves will add an elegant and sophisticated touch while providing extra storage to your bathroom. Most emerge to float along the bathroom wall; making the bathroom seems roomier. Then, the other can be installed over the toilet or under a medicine cabinet to offer a versatile addition to a current decoration.
How to Install Glass Shelves in Your Bathroom
Installing a glass shelf in a bathroom is surely a good idea. How is exactly the step by step to install glass shelves in a bathroom?
Step by Step for Installing Glass Shelves in Your Bathroom
To install glass shelves for bathroom, you may need to prepare for some type of equipment first such as measuring tape, painter's tape, hammer, screwdriver, drill, masonry drill bit and the shelf bracket kit itself. You can follow the step by step for installing the glass shelves as follow if you have prepared all of these things.
Step # 1: Bring it together
Of all, you need to bring the shelf and its holders together (not the brackets). Hold the shelf against the wall where you want to install the glass shelves. On the wall, you need to mark the midpoint of each shelf holder. For the best result, you should be careful about marking the position.
Step # 2: Level
Remove the bathroom glass shelf and use a level to expand the mark you made before into a 3-inch vertical line. At this point, you have to employ the level to mark a straight line across the midpoint of these lines. It will help you to install the shelves properly later on.
Step # 3: Drill holes
With the help of the lines you made before, drill the necessary holes to install the shelves. Put your bracket aside first to drill a quarter inch hole at the mark.
If you have drilled the hole, insert the packaged wall anchors into the holes. For the second bracket, you just need to repeat the step in the same way.
Step # 4: Mount the shelf
The last, you will need to remove the glass shelving for bathroom from its holders. If the shelf mount is level, slide one of the holders over the bracket and then check. After that, stiffen the setscrew. Repeat the step for the other holder. Next, put the shelf in and attach in place.
However, if the shelf mount is not level, you should remove a holder and release the bracket screws. After that, slide the bracket down or up to create the unit level. You can redo the steps once it is level. In case you are installing a corner bathroom shelf, you may need some adjustments with the steps.
If you're looking for the best bathroom shelf, our recommendation would be the one from RackUp, it has all the features you need, and made of premium material which ensures longevity. You can check them out through https://www.amazon.com/Bathroom-Organizer-Storage-Anti-Rust-Aluminum/dp/B07635NDN2?SubscriptionId=AKIAJWUNWFOQULLYMUQA&tag=earth-techshop0-20&linkCode=xm2&camp=2025&creative=165953&creativeASIN=B07635NDN2
The Ultimate Cheat Sheet on Rackup Bathroom Antirust

Bathroom glass shelves will add an elegant and sophisticated touch while providing extra storage to your bathroom. Most emerge to float along the bathroom wall; making the bathroom seems roomier. Then, the other can be installed over the toilet or under a medicine cabinet to offer a versatile addition to a current decoration.
How to Install Glass Shelves in Your Bathroom
Installing a glass shelf in a bathroom is surely a good idea. It is easy to install and does not need big planning and clean up. More interestingly, you can use it as soon as it is installed in your bathroom. How is exactly the step by step to install glass shelves in a bathroom?
Step by Step for Installing Glass Shelves in Your Bathroom
To install glass shelves for bathroom, you may need to prepare for some type of equipment first such as measuring tape, painter's tape, hammer, screwdriver, drill, masonry drill bit and the shelf bracket kit itself. You can follow the step by step for installing the glass shelves as follow if you have prepared all of these things.
Step # 1: Bring it together
Of all, you need to bring the shelf and its holders together (not the brackets). Hold the shelf against the wall where you want to install the glass shelves.
Step # 2: Level
Remove the bathroom glass shelf and use a level to expand the mark you made before into a 3-inch vertical line. At this point, you have to employ the level to mark a straight line across the midpoint of these lines. It will help you to install the shelves properly later on.
Step # 3: Drill holes
With the help of the lines you made before, drill the necessary holes to install the shelves. Center the center round hole of your bracket over the joint of the vertical and horizontal lines. After that, mark the center of every oblong hole. Put your bracket aside first to drill a quarter inch hole at the mark.
If you have drilled the hole, insert the packaged wall anchors into the holes. For the second bracket, you just need to repeat the step in the same way.
Step # 4: Mount the shelf
Slide one of the holders over the bracket and then check if the shelf mount is level. Next, put the shelf in and attach in place.
If the shelf mount is not level, you should remove a holder and release the bracket screws. In case you are installing a corner bathroom shelf, you may need some adjustments with the steps.
If you're looking for the best bathroom shelf, our recommendation would be the one from RackUp, it has all the features you need, and made of premium material which ensures longevity. You can check them out through https://www.amazon.com/Bathroom-Organizer-Storage-Anti-Rust-Aluminum/dp/B07635NDN2?SubscriptionId=AKIAJWUNWFOQULLYMUQA&tag=earth-techshop0-20&linkCode=xm2&camp=2025&creative=165953&creativeASIN=B07635NDN2
Addicted to glass shelf bathroom oil rubbed bronze? Us Too. 6 Reasons We Just Can't Stop

Bathroom glass shelves will add a sophisticated and elegant touch while providing extra storage to your bathroom. Most emerge to float along the bathroom wall; making the bathroom seems roomier. The other can be installed over the toilet or under a medicine cabinet to offer a versatile addition to a current decoration.
How to Install Glass Shelves in Your Bathroom
Installing a glass shelf in a bathroom is surely a good idea. How is exactly the step by step to install glass shelves in a bathroom?
Step by Step for Installing Glass Shelves in Your Bathroom
To install glass shelves for bathroom, you may need to prepare for some type of equipment first such as measuring tape, painter's tape, hammer, screwdriver, drill, masonry drill bit and the shelf bracket kit itself. If you have prepared all of these things, you can follow the step by step for installing the glass shelves as follow.
Step # 1: Bring it together
Of all, you need to bring the shelf and its holders together (not the brackets). Hold the shelf against the wall where you want to install the glass shelves.
Step # 2: Level
Secondly, remove the bathroom glass shelf and use a level to expand the mark you made before into a 3-inch vertical line. At this point, you have to employ the level to mark a straight line across the midpoint of these lines. It will help you to install the shelves properly later on.
Step # 3: Drill holes
With the help of the lines you made before, drill the necessary holes to install the shelves. Put your bracket aside first to drill a quarter inch hole at the mark.
If you have drilled the hole, insert the packaged wall anchors into the holes. For the second bracket, you just need to repeat the step in the same way.
Step # 4: Mount the shelf
The last, you will need to remove the glass shelving for bathroom from its holders. Slide one of the holders over the bracket and then check if the shelf mount is level. After that, stiffen the setscrew. Repeat the step for the other holder. Next, put the shelf in and attach in place.
If the shelf mount is not level, you should remove a holder and release the bracket screws. After that, slide the bracket down or up to create the unit level. Once it is level, you can redo the steps. In case you are installing a corner bathroom shelf, you may need some adjustments with the steps.
If you're looking for the best bathroom shelf, our recommendation would be the one from RackUp, it has all the features you need, and made of premium material which ensures longevity. You can check them out through https://www.amazon.com/Bathroom-Organizer-Storage-Anti-Rust-Aluminum/dp/B07635NDN2?SubscriptionId=AKIAJWUNWFOQULLYMUQA&tag=earth-techshop0-20&linkCode=xm2&camp=2025&creative=165953&creativeASIN=B07635NDN2
20 Gifts You Can Give Your Boss if They Love Dr. Foot Under Desk Foot

The foot muscles operate the tendons and ligaments in holding the foot in many positions. The stress may be attributed to obese, poor posture, improper and fatigue foot rest.
A leg rest is utilized to break the foot and offer relaxation to Legs and the trunk. When sitting on a chair with no foot rest the legs are with no support beneath, the hips is pushed forwards and down causing back and neck pain. Blood blood circulation is also affected. The nerves can also get pressed affecting the back of the knees. In case you have the footrest the legs will not be dangling, they'll be on a solid ground in the proper height, push the pelvis a little back and permit the seat to present an assistance to the back correcting your position, therefore decreasing footrest pain at the trunk. It is more so crucial for those who have long sitting office hours. This is a result of the fact that sitting on a chair for a protracted period is a fixed position which triggers stress on the trunk, neck, shoulders, arms and thighs. This puts in strain on the trunk and spinal column disks. Slouchy position over an extended duration at work chair is a massive factor in causing back and neck pain.
A tilted footrest at a proper angle and at the appropriate Height supplies correct knee and leg posture which is not just really comfortable to an person struggling with any pain in the back nevertheless is a huge convenience for those struggling with gout, gout, aching back, etc. A foot rest with a massive platform provides the flexibility of free movement of the feet and the legs that can be essential in preventing foot rest back distress. Improper footrest especially in the work place can be a cause for harm to spine discs and copying back distress. The foot rest should have non skidding surface area as a skidding surface will probably be more uncomfortable irritating footrest pain in the back even further. Various types of foot remainder are easy to get in the industry however the best footrest is the one that offers convenience from back pain, increases blood circulation from the legs, also supplies maximum placement of the human body posture. You may also select an adjustable footrest which can be used by people of various heights. The foot rest also lets you stretch your entire body and supply you with much sought after relaxation. Some of the footrests are with wooden roller chunks that can massage your feet.
It's made of high quality pine timber, which designed specifically to comfort your feet as well as to be a wonderful addition in below your desk. It has all of the features you need.
To learn more, go to https://www.amazon.com/Ergonomic-Foot-Rest-Footstool-Circulation/dp/B00XJJ2E76/ref=as_li_ss_il?s=office-products&ie=UTF8&qid=1480195290&sr=1-7&keywords=chair+foot+rest&linkCode=li3&tag=mfm050-20.
6 Books About under desk leg rest You Should Read

Foot when the feet are not on a foot rest leading to footrest back pain. The foot muscles operate the ligaments and tendons in holding the foot in number of positions. The stress may be due to obese, poor posture, fatigue and improper foot rest.
A desk foot stool can be used to break the foot and offer relaxation to Legs and the back. When sitting on a chair without a foot rest the legs are without a support beneath, the buttocks is pushed forward and down causing back and neck pain. Blood blood flow is also affected. The nerves may also get pressed affecting the back of the knees. In case you have the footrest the legs will not be dangling, they will be on a firm ground at the proper height, push the pelvis a little back and enable the chair to present an help to the back fixing your posture, therefore decreasing footrest pain in the back. It's more so crucial for people who have long sitting office hours. This is a result of the fact that sitting on a chair for a prolonged period is a predetermined position which triggers stress on the back, neck, shoulders, arms and thighs. This puts in strain on the back muscles and spinal column discs. Slouchy standing over an extended duration in the office chair is a massive factor in causing neck and back pain.
A tilted footrest in a correct angle and at the appropriate Height provides correct knee and leg posture that's not only really comfortable to an individual not suffering from any pain at the back however is a huge advantage for those struggling with gout, gout, aching back, etc. A foot rest with a large platform provides the flexibility of free motion of their feet and the legs that can be crucial in preventing foot rest back distress. Improper footrest specifically in the work area can be a cause for damage to spine disks and repeating back discomfort. The foot rest should have non skidding surface region as a skidding surface will probably be uncomfortable irritating footrest pain in the back even farther. Different kinds of foot remainder are easy to get in the industry however the best footrest is the one which offers advantage from spine pain, increases blood circulation in the legs, and supplies maximum placement of their body posture. You can also go in for an adjustable footrest which can be used by individuals of various heights. The foot rest also permits you to stretch your body and supply you with much sought after relaxation. A few of the footrests are with wooden roller balls that can massage your feet.
It's made from high quality pine timber, that designed specifically to comfort your feet as well as to be a nice addition in below your desk. It has all of the characteristics you want.
To learn more, go to https://www.amazon.com/Ergonomic-Foot-Rest-Footstool-Circulation/dp/B00XJJ2E76/ref=as_li_ss_il?s=office-products&ie=UTF8&qid=1480195290&sr=1-7&keywords=chair+foot+rest&linkCode=li3&tag=mfm050-20.
9 Things Your Parents Taught You About Dr. Foot Wood Stool
Foot once the feet aren't on a foot rest leading to footrest back pain. The foot muscles operate the tendons and ligaments in holding the foot in many positions. The stress may be due to obese, bad posture, improper and fatigue foot rest.
A under desk leg rest can be utilized to rest the foot and offer comfort to Legs and the trunk. When sitting on a seat without a foot rest the legs are without a support beneath, the hips is pushed forward and down causing neck and back pain. Blood blood circulation is also affected. The nerves may also get pressed affecting the back of the knees. In case you have the footrest the legs won't be dangling, they'll be on a solid ground in the appropriate elevation, push the pelvis a little back and permit the chair to provide an help to the back fixing your posture, therefore decreasing footrest pain at the back. It's more so crucial for people who have long sitting office hours. This is a result of the fact that sitting on a chair for a prolonged period is a fixed position which triggers stress on the trunk, neck, shoulders, arms and legs. This puts in pressure on the trunk and spinal column disks. Slouchy position over an elongated duration at work chair is a massive factor in causing neck and back pain.
A tilted footrest in a proper angle and at the appropriate Height provides correct leg and knee posture that's not only really comfortable to an person struggling with any pain in the back nevertheless is a huge advantage for those struggling with gout, gout, aching back, and so on. A foot rest with a large platform supplies the flexibility of free movement of their feet and the legs which can be crucial in preventing foot remainder back discomfort. Improper footrest especially at the work area may be cause for harm to spine discs and repeating back distress. The foot rest should have non skidding surface region as a skidding surface will be more uncomfortable irritating footrest pain at the back even further. Different types of foot remainder are readily available on the market nevertheless the best footrest is that the one that offers convenience from spine pain, increases blood flow in the legs, and provides maximum positioning of their body posture. You may also select an adjustable footrest which can be used by people of different heights. The foot rest also lets you stretch your entire body and provide you with much sought after comfort. A few of the footrests are with wooden roller balls which could massage your toes.
To find the one from Dr. Foot Rush Wood. It is made of high quality pine wood, that designed particularly to comfort your feet as well as to be a wonderful improvement in below your desk. It has all the features you want.
For more information, go to https://www.amazon.com/Ergonomic-Foot-Rest-Footstool-Circulation/dp/B00XJJ2E76/ref=as_li_ss_il?s=office-products&ie=UTF8&qid=1480195290&sr=1-7&keywords=chair+foot+rest&linkCode=li3&tag=mfm050-20.
The Dr. Foot Under Desk Foot Awards: The Best, Worst, and Weirdest Things We've Seen

In adults trouble arises when undue strain is put on the Foot when the feet are not on a foot rest leading to footrest back pain. The foot muscles operate the ligaments and tendons in holding the foot in many positions. The stress might be attributed to obese, bad posture, fatigue and improper foot rest.
A under desk leg rest is used to rest the foot and offer comfort to Legs and the trunk. When sitting on a chair without a foot rest the legs are with no support beneath, the buttocks is pushed forwards and down causing neck and back pain. Blood blood flow is also impacted. The nerves may also get pressed affecting the back of the knees. In case you have the footrest the legs will not be dangling, they'll be on a solid ground in the proper elevation, push the pelvis a little back and enable the seat to present an assistance to the back correcting your position, therefore decreasing footrest pain in the trunk. It is more so crucial for people who have long sitting office hours. This is due to the fact that sitting on a chair for a protracted period is a predetermined posture which triggers stress on the back, neck, shoulders, arms and legs. This puts in pressure on the back muscles and spinal column disks. Slouchy standing over an extended duration at work chair is a huge factor in causing neck and back pain.
A tilted footrest in a proper angle and in the appropriate Height supplies correct knee and leg posture which is not only really comfortable to an individual not suffering from any pain in the back however is a huge advantage for individuals fighting with arthritis, gout, aching back, and so on. A foot rest with a massive stage supplies the flexibility of free motion of the toes and the legs which could be essential in preventing foot remainder back distress. Improper footrest specifically in the work area can be a cause for harm to spine discs and copying back distress. The foot rest must have non skidding surface area as a skidding surface will probably be uncomfortable irritating footrest pain at the back even farther. Various types of foot rest are easy to get on the market nevertheless the very best footrest is that the one which offers convenience from spine pain, increases blood flow in the legs, also provides maximum placement of the body posture. You may also go in for an adjustable footrest that can be utilized by individuals of different heights. The foot rest also permits you to stretch your body and provide you with much desired comfort.
In case you're looking for a grea footrest, then we recomment you To find the one from Dr. Foot Rush Wood. It's made from high quality pine wood, that designed particularly to comfort your feet as well as to be a wonderful improvement in below your desk. It has all the features you want.
To learn more, visit https://www.amazon.com/Ergonomic-Foot-Rest-Footstool-Circulation/dp/B00XJJ2E76/ref=as_li_ss_il?s=office-products&ie=UTF8&qid=1480195290&sr=1-7&keywords=chair+foot+rest&linkCode=li3&tag=mfm050-20.
The Most Pervasive Problems in Dr. Foot Rest Wood
In adults Difficulty arises when undue strain is put on the The foot muscles work the ligaments and tendons in holding the foot in many positions. The stress may be due to obese, bad posture, fatigue and improper foot rest.
A leg rest is used to rest the foot and offer comfort to Legs and the back. When sitting on a chair without a foot rest the legs are without a support beneath, the buttocks is pushed forwards and down causing back and neck pain. Blood blood circulation can be impacted. In case you've got the footrest the legs will not be dangling, they will be on a firm ground at the proper elevation, push the pelvis a little back and enable the chair to present an help to the back correcting your position, therefore decreasing footrest pain at the trunk. It's more so crucial for people who have long sitting office hours. This is a result of the fact that sitting on a chair for a prolonged period is a fixed position which triggers stress on the back, shoulders, neck, arms and legs. This puts in strain on the trunk and spinal column disks. Slouchy standing over an elongated duration in the office chair is a huge factor in causing neck and back pain.
A tilted footrest in a correct angle and in the proper Height supplies correct leg and knee position that's not just really comfy to an individual struggling with any pain at the back nevertheless is a huge convenience for those struggling with gout, gout, aching back, and so on. A foot rest with a massive stage supplies the flexibility of free movement of the toes and the legs which can be crucial in preventing foot remainder back distress. Improper footrest especially in the work area can be a cause for harm to spine disks and repeating back discomfort. The foot rest should have non skidding surface region as a skidding surface will probably be more uncomfortable irritating footrest pain in the back even further. Different types of foot rest are readily available in the industry however the very best footrest is the one that offers advantage from spine pain, increases blood circulation in the legs, and supplies maximum positioning of the body posture. You can also select an adjustable footrest that could be utilized by people of various heights. The foot rest also permits you to stretch your body and supply you with much desired relaxation.
In case you're looking for a grea footrest, then we recomment you It's made of high quality pine timber, that made specifically to comfort your feet and to be a wonderful improvement in below your desk. It has all of the characteristics you want.
To learn more, visit https://www.amazon.com/Ergonomic-Foot-Rest-Footstool-Circulation/dp/B00XJJ2E76/ref=as_li_ss_il?s=office-products&ie=UTF8&qid=1480195290&sr=1-7&keywords=chair+foot+rest&linkCode=li3&tag=mfm050-20.


